

jumpsmasher
-
Posts
344 -
Joined
-
Last visited
Content Type
Profiles
Forums
Calendar
Posts posted by jumpsmasher
-
-
I are quite happy with the ViaAqua Titanium heaters i been using. They come with an external temperate controller / sensor and a titanium heating rod. They cost around $50 at Pets and Ponds.
-
Congratulations! Just make sure there is plenty of biofilm in the tank for them to feed on the for first while. There is also powdered baby shrimp food out there but you should really need it if there is lot of biofilm and not too many baby shrimps. As long as you keep your parameters in check they should be doubling in size each week for the first four weeks or so
-
and those tube are just ceramic breeding tubes; It is designed to give the female shrimps a place to hide after they moult - breeding takes place right after the female moult and aggressive males can sometime kill females as they are pretty weak and vunerable during this time
-
I'm a little unclear of your water auto top off, do you mind giving a bit of a zoom in on that?
Looks really sharp all the way around. Looks like a shrimp playground, with some of those stacked cylinders, what are they called?
Oh that's because they are not installed yet :P still testing a few different float valves at the moment but it will works similar to the system i have for my old rack;
I have two reservoir tanks on the top of the rack; one with pure RO water (for top-ups) and one with re-mineralized RO water (for water changes). I run a couple of lines using rigid RO tubing and connectors from both reservoirs to each of tank; each has a ball / shut-off valve to control the flow or shut it off and than use a "Y" or "T" connector to connect them to a single float value and is mounted on the tank

Normally the RO water line is turn "on" and the remineralized RO water is turn "off", so if any water lost to evaporation is replaced with RO to maintain the water level. During water changes I turn the RO water line off, drain some water and than turn the remineralized RO water on adjust the flow so it will drip in new water over several hours.
On this rack i am using the the float valve but not the tank mount brackets. Because of my choice to go with HMF filters and eurobraces, I got concept to make me some "tabs" on top of the eurobaces that would allow me to mount my float valves on the back of the tank and hopefully without getting in the way of the HMF filters. This also save me some $$$ as float valves by themselves cost a fraction of a complete top-up system like above with the tank mount. The tricky one is fit the right float valve that can be mounted vertically, clear the HMF filter, and be small enough to be discrete while being long enough to reach down to keep water level where I want it.
This is the mounting hole for the float valve in the new tanks:
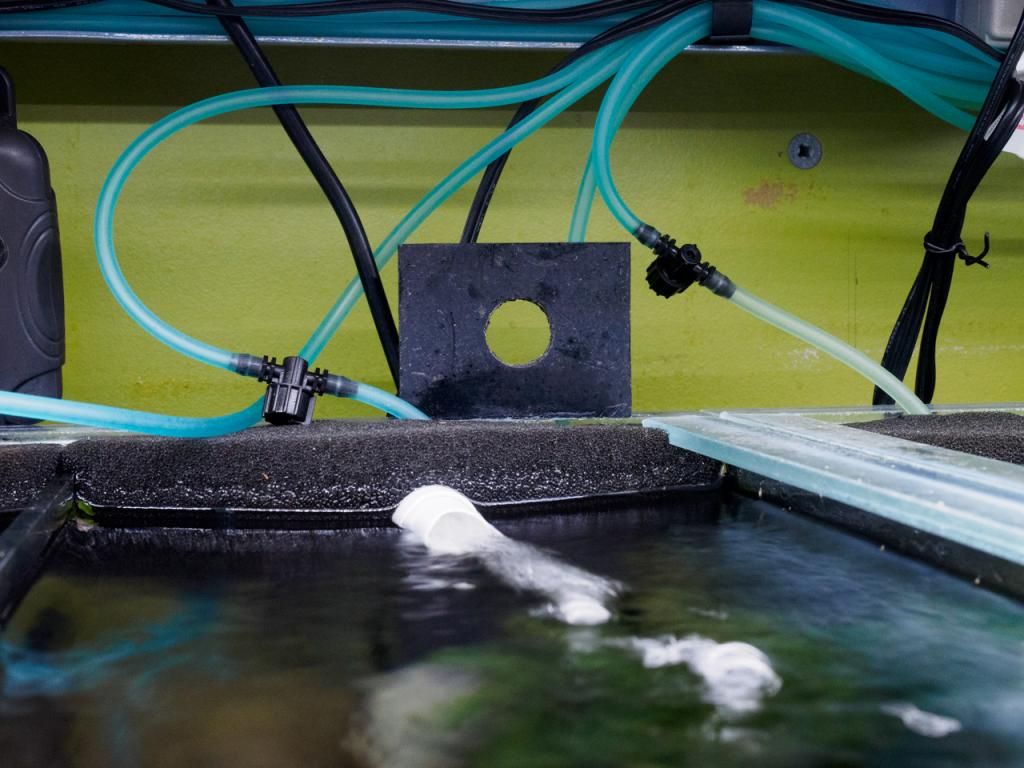
I have one that works pretty well but it is bit too big for my liking so waiting one a few more that are coming in the mail to test out.
-
Ya I am not a big fan of using breeder boxes in general; I prefer a divided / separate tank for that purpose. I usually use them to prep shrimps for shipping. But if they were large enough it might work... I will email you what I am looking for.
In the middle where the jetlifters are there is a bit over 1". I also hide my heaters in the same spot. On the edge, there is basically no space as I push them up against the back. I don't plan taking them out while the tanks are up. If I need too I can turn off the air pump and siphon the water from poret bilut poret is "suppose" to last a long time without cleaning.. Will be I while before I get to find that out or not.
-
Hi Hung,
Your set up really looks good.
Are the sponges poret filters? Looks like you do not run mechanical filter.
Do you like the breeder box?
How's the Bucephalandras?
yup those are all 45ppi Poret HMF filter with Jetlifters. No room on the rack for canister filters - wanted to use as much of the rack as possible for tanks.
The breeder box is alright; I think it would be good for photography; no sure if i would use it for breeding - it would worked better if they made it wider than it is tall.
The bucs are doing pretty good so far.. I split a few out and attached them to lava rocks, will see if i can grow them using those LED lights : )
-
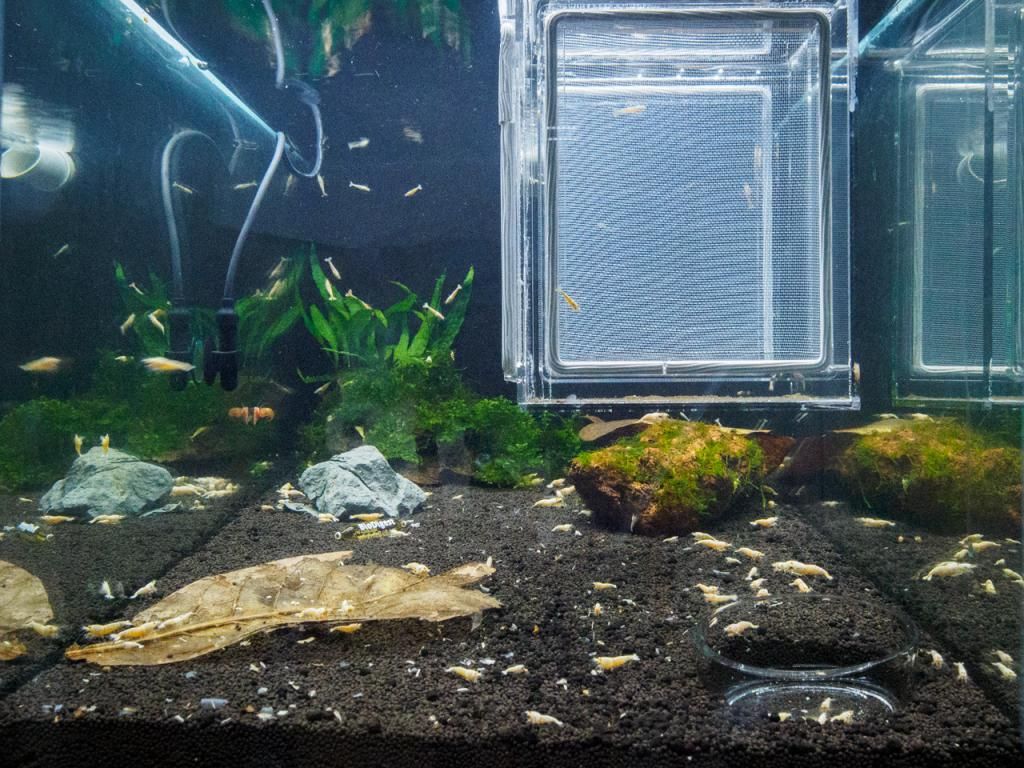
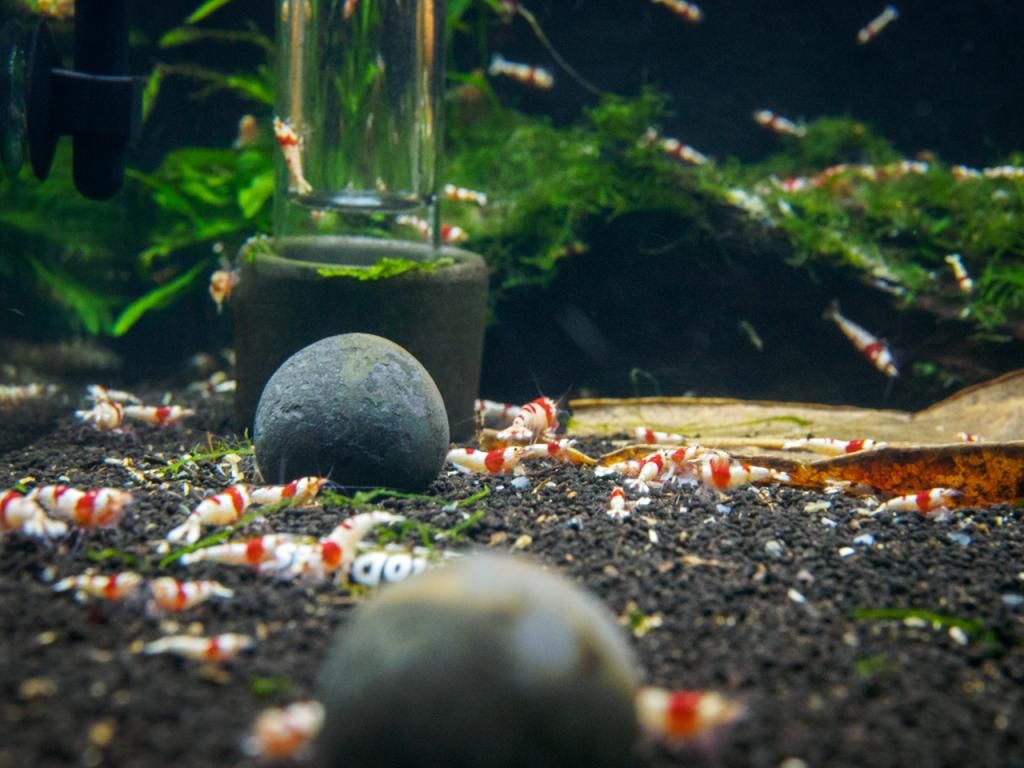
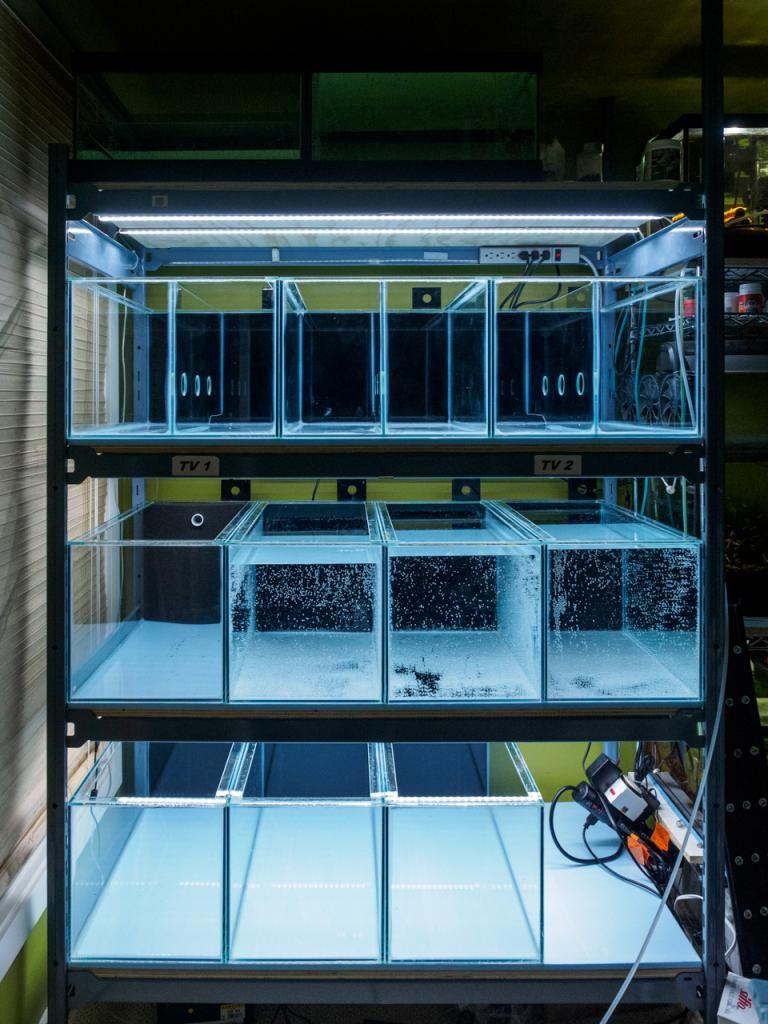
Finished moving all the shrimps for middle row the other day and finally got around to cleaning the glass and taking some shots of the rack and tanks.
Here is the rack as it stand today:
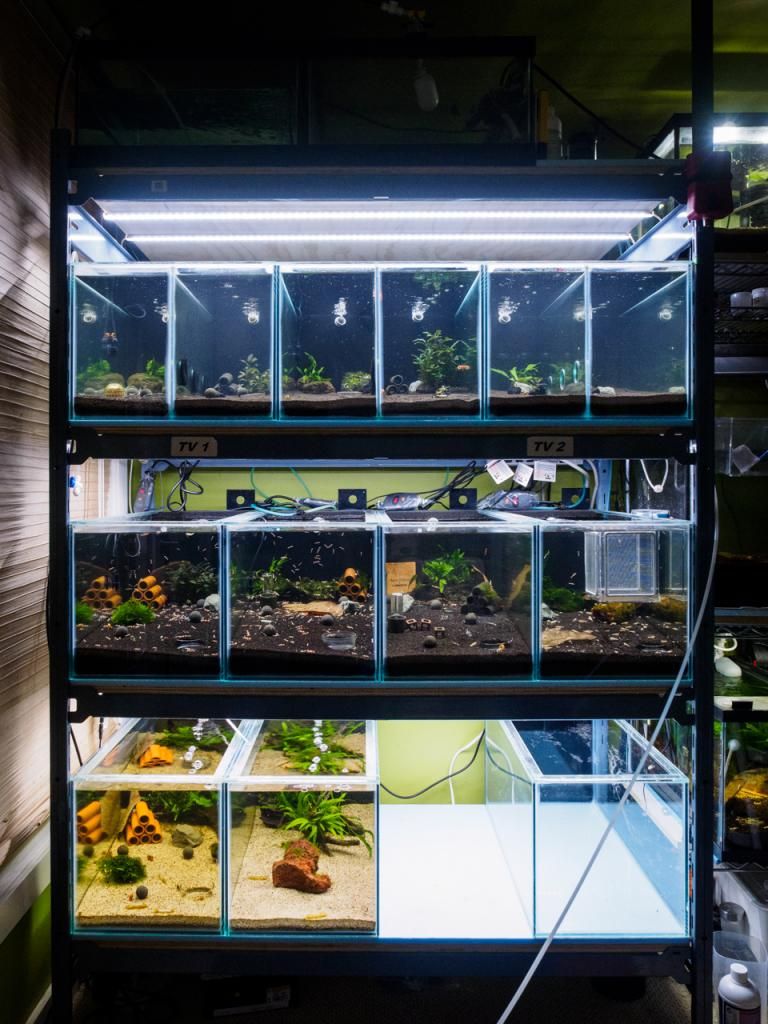
Middle row is now fully populated
Top row probably got another week or so left before it finish cyclingBottom row got some OEBT's in the tank on the left, haven't decided that to do with the 2nd tank and I will still waiting for the 2nd batch of tanks to get deliver to finish up the last two tanks on the right.
The Middle row is set up as follows (L to R)
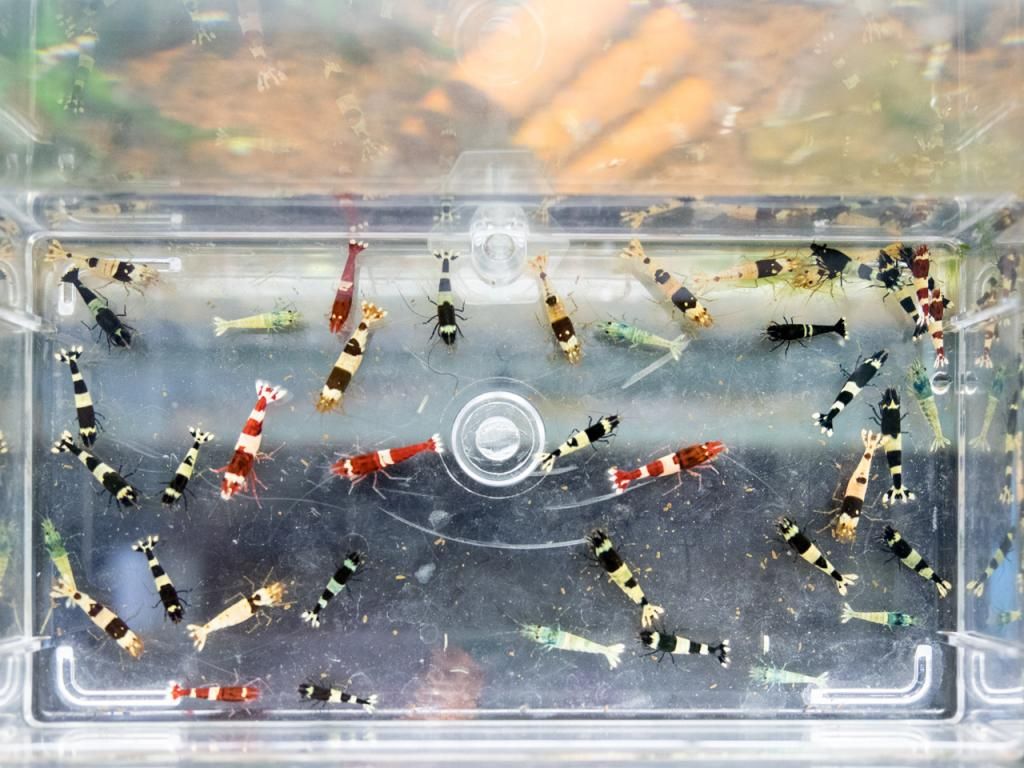
PRL culls (mixed band)
PRL culls (hiro / no-entry)
Taiwan Bees
Golden Bees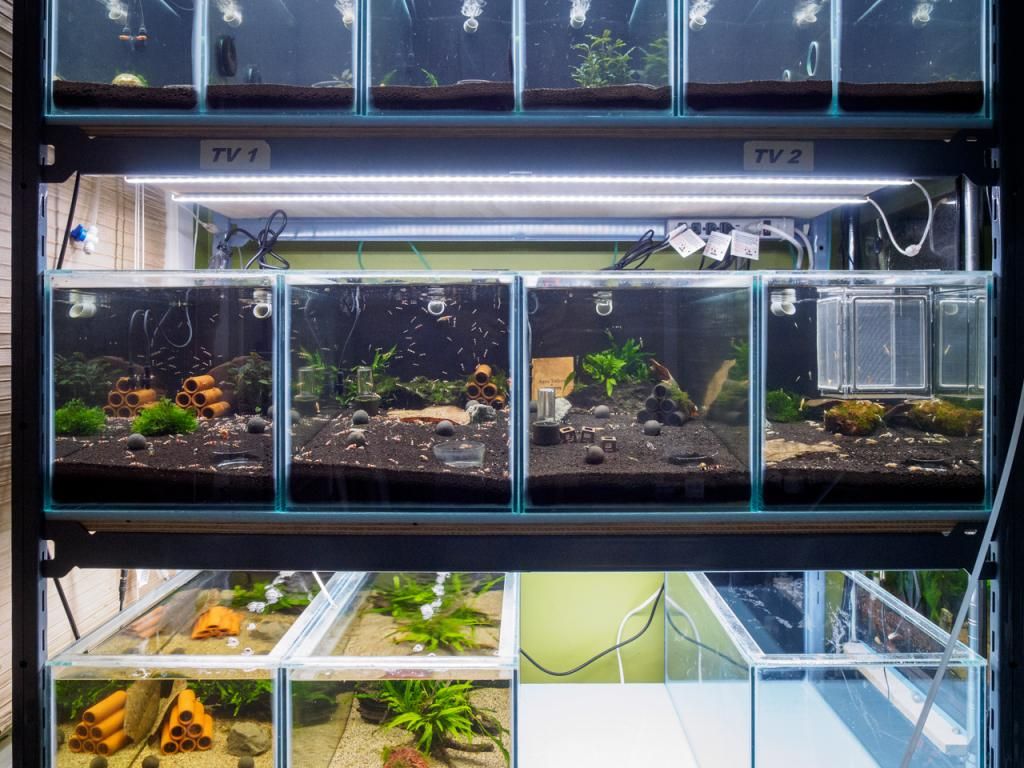
PRL culls (mixed band) tank
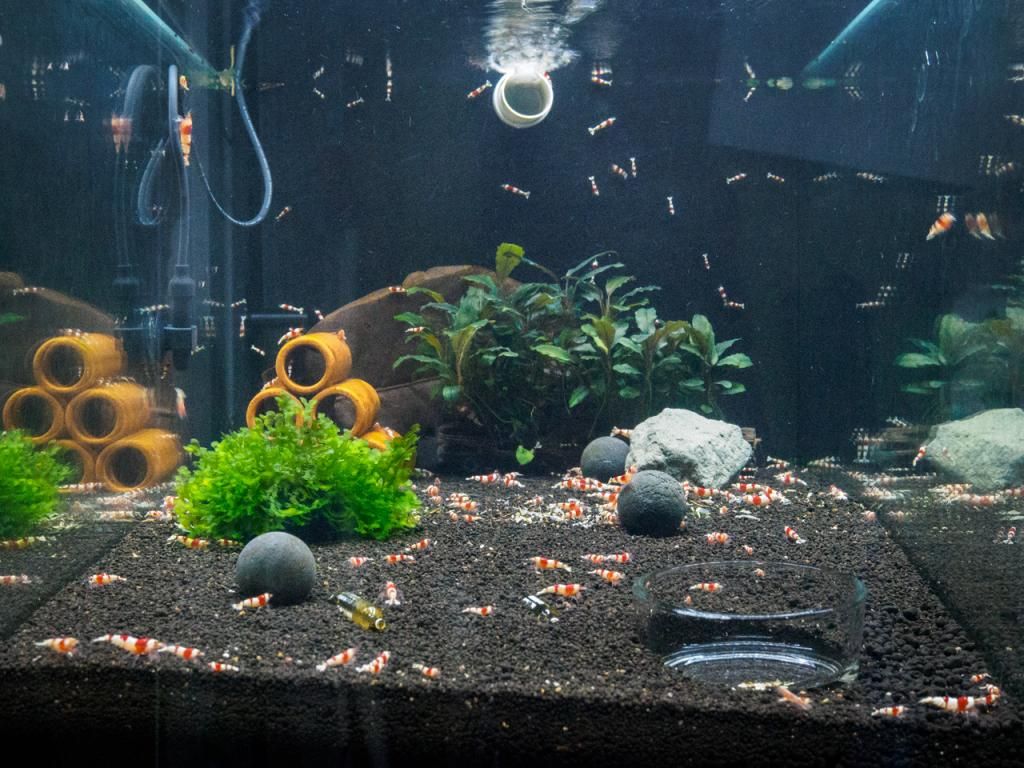
PRL culls (hiro / no-entry) tank
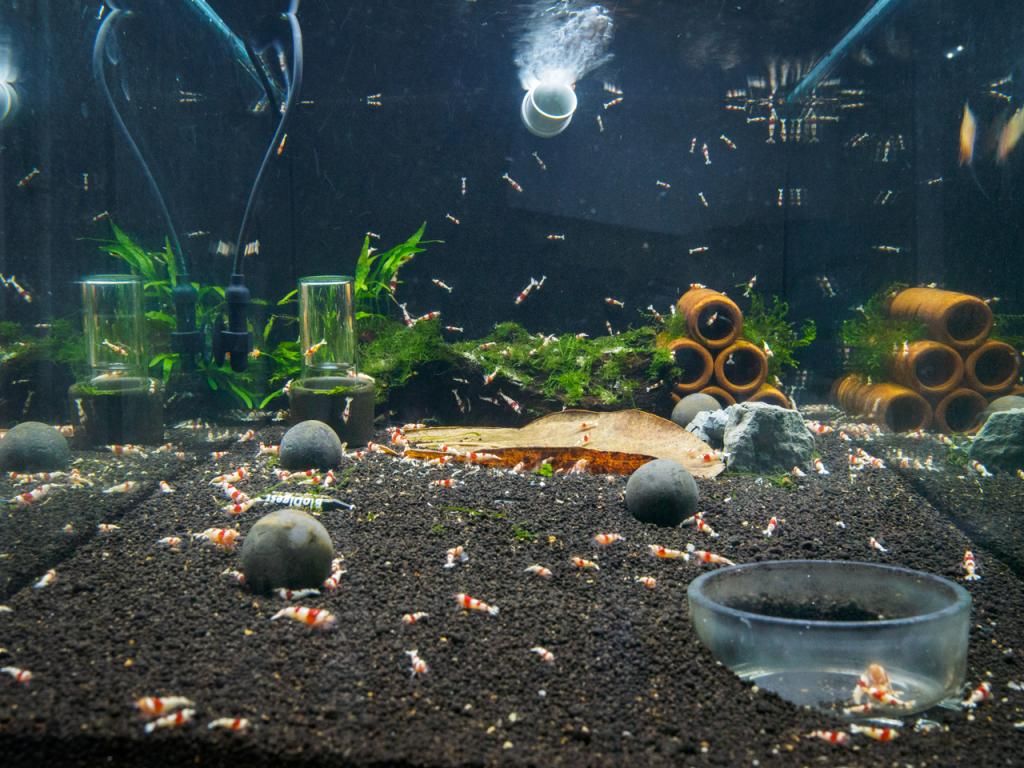
Taiwan Bee tank
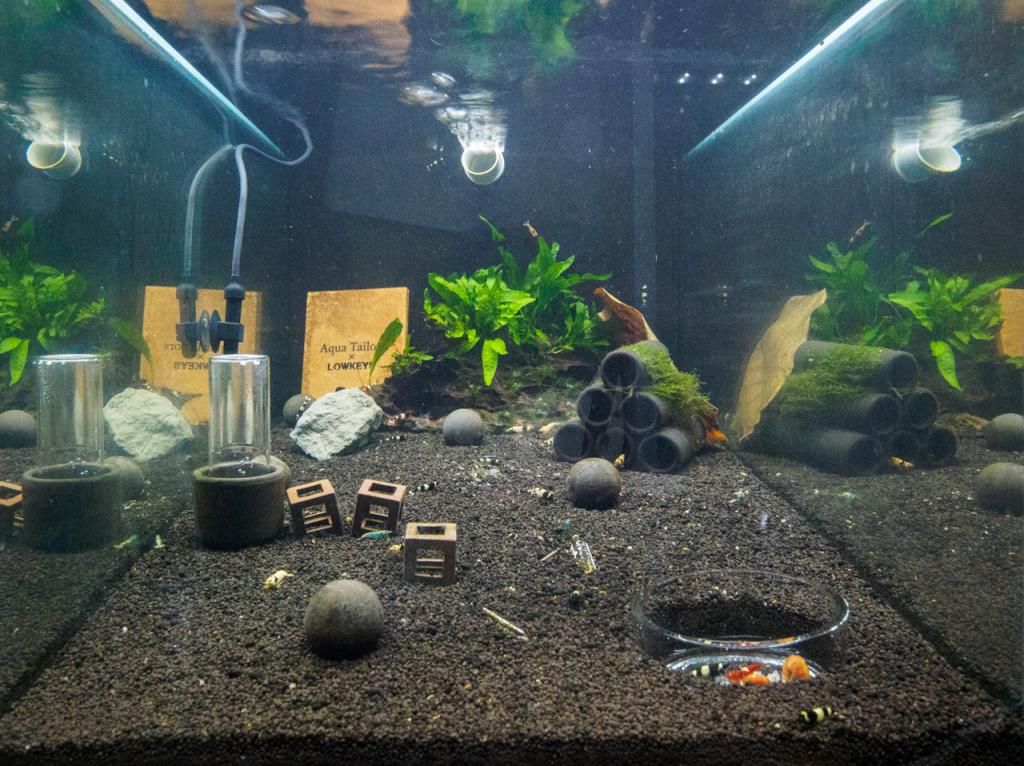
Golden Bee Tank
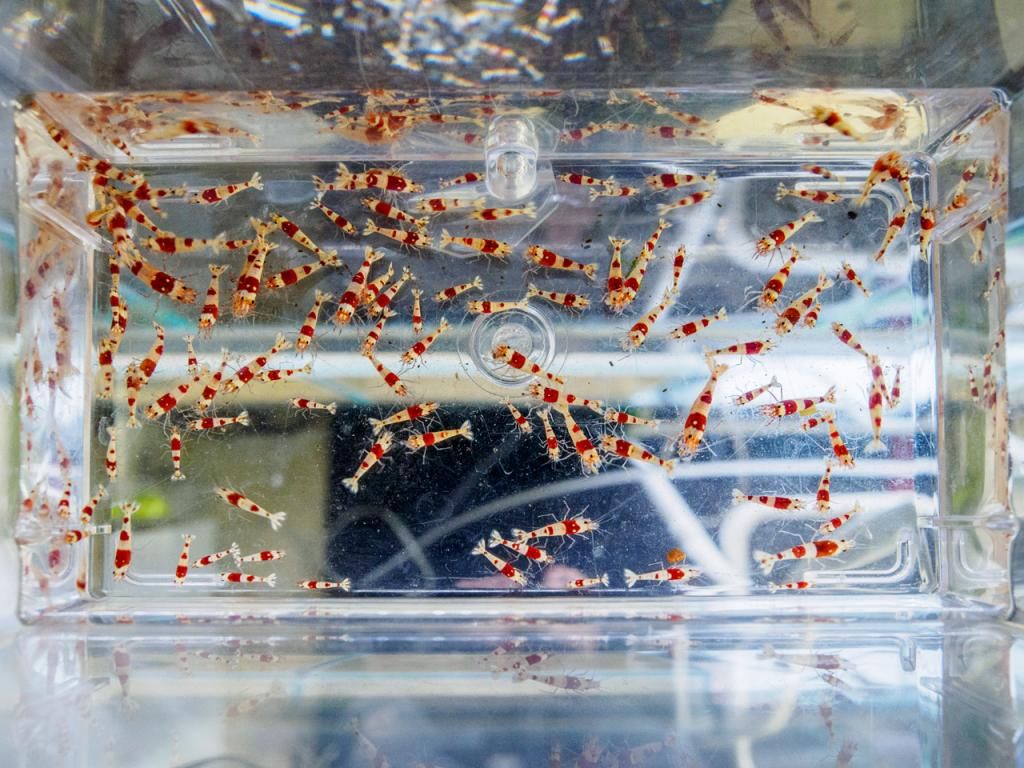
(have a breeder box that is empty - was just testing it out)and a parting shot from some of my PRL culls
Still left to do:
- wait for top fow of tanks to finish cycling and transfer the shrimps over
- hook up the LED lights to a single PSU (400w) and maybe add a controller
- hook up the plumbing (float valves, water lines, etc; ) for the auto top-up / water change system - still testing out a couple of different float valves.- shut down old rack (to the right of new rack) and extend rack with another 4ft section
- get another set of tanks from custom tank builder and set them up / finish off the bottom row
-
Fast forward to last week:
I started transferring over the shrimps for the middle row (top row was still showing a bit of nitrates) . It was a long process as I could only do a couple of batches per day as I was drip acclimatizing them.
This was the last batch of my taiwan bee shrimps be moved:
And one of many batches of PRL culls which are going into separate tanks; didn't count how many had to do at least 6 batches and there was usually 50-100 shrimps each time.
 L]
L] -
okay been a while since I last posted but the good new is most of the tanks completed cycling over the holidays but I been away for work so I didn't have a chance to move all my shrimps over over their old tanks until last week.
But first some old photos in case people are wonder how I set up the tanks:
Substrate additives:
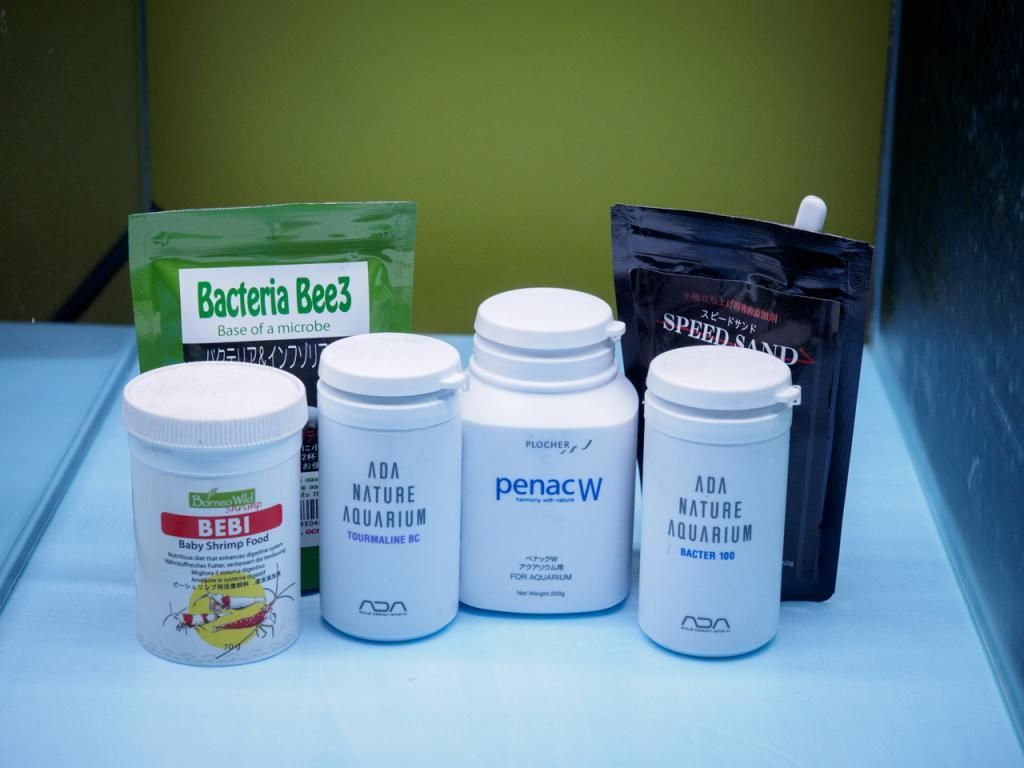
Definitely overkill but I had a bunch of products I wanted test out or use up :p
And here is what is looks like after it is all said and done
Kinda looks like a Jackson Pollock painting : ) too bad it gets covered up with ADA Aquasoil.
-
Test your nitrates; nitrate spikes are common around the one month mark with new shrimp tanks.
Also if you are just topping off and not doing water changes use just pure RO.
I also heard some horror stories with prime and shrimps so I don't use it myself for shrimps.
-
Better check with where you buy your lights to make sure that will warranty your lights for the full five years. I know with my Aquaray, J&L covered it for the first year, than after that I had with deal with TMC directly (UK)
The second time my power supply died with them I was cheaper to buy the replacement power supply myself than to ship the light back for RMA.
IMHO there is not point in planning too far ahead with LED lighting - it is changing so quickly at this point. Chances are in 2-3 years the LED will be so much advance than you probably want to upgrade even if your fixture is still working. And of course costs are coming down all the time as well.
Best to buy something that will do what you need it to do now and than some. Pay extra for all the bells and whistles if you like.
Yea I was aware of this. How is the light doing for you? Salt or fresh? I kinda bit the bullet and bought some T5HO set ups second hand I couldn't beat the price and I wont need to replace any equipment for quite some time. Thx for the reply.
The aquaray is alright, when when down for the second time I replaced it with an extra Finnex FugeRay I had lying around. Plants grew much faster with the fugeray but the AquaRay is still going now that I have a new power supply. Since i have rack setup I am experimenting with DIY LED strips - still in the process of cycling my tanks so still too early to tell how effective they are for their intended purpose.
For my standalone tanks i have switched all of them to Finnex now and I don;t think you can really beat them for the prices i paid for them.
T5HO can get pricey in the long run due to the cost of replacing the bulbs, and they also generate a decent amount of heat (big issue with my tanks as most require active cooling). I still got some tanks with T5HO but I notice if you don't replace the bulbs regularly (~ approx. yearly) my some higher demand plants just melt or crash. I guess you can stockpile a bunch but even at $10 a bulb, it can get pricey for a small fish room set up.
If i ever did a show tank i would probably go for one of those new Hydra units that Ron has or maybe a nice set of pedestal LED lights
-
Better check with where you buy your lights to make sure that will warranty your lights for the full five years. I know with my Aquaray, J&L covered it for the first year, than after that I had with deal with TMC directly (UK)
The second time my power supply died with them I was cheaper to buy the replacement power supply myself than to ship the light back for RMA.
IMHO there is not point in planning too far ahead with LED lighting - it is changing so quickly at this point. Chances are in 2-3 years the LED will be so much advance than you probably want to upgrade even if your fixture is still working. And of course costs are coming down all the time as well.
Best to buy something that will do what you need it to do now and than some. Pay extra for all the bells and whistles if you like.
-
I know it's a little late but I too was searching for a good led for a planted tank. I am new to the hobby but I do a lot of research before I jump into something and I've come to the conclusion that for best bang for my buck the Aquaray led's by TMC are a great choice. J&L in Vancouver stocks them and that says something in itself and gives us a great place to order them from at fair prices for the quality. Anyone looking to get through a lot of hoops on this issue should research PAR vs PUR in led lighting and the difference from say T5 par and LED par readings. http://www.aquarium-pond-answers.com/2012/03/pur-vs-par-in-aquarium-lighting.html good link on the subject. If you dig deeper and look hard you will find the pros using aquaray for it's awesome pur and pwm technology at a good price. Apparently in Europe these lights are all the rage but unknown to the masses in north america for many different reasons. I encourage everyone to do research on these lights, and the numerous opinions on them and the science of led lighting in general before buying say a Finnex unit. Especially when we Canadians would be jumping threw so many hoops for that light at the moment when for the same price we could get something far superior for what we want to do any ways right out of Vancouver.
I plan on purchasing the aquaray mini 400 for a small chi or standard 5.5 betta tank to start learning from experience and keep costly mistakes cheaper. Even though I've researched planted tanks to death I think it's something you gotta do a lot of the stuff not just read or watch on you tube.
I'm not saying I'm correct. But I read a lot of different articles on this subject from a lot of different sources. What I found was a bunch of marketing hoopla or un-researched bias opinions promoting this light or that light and not a lot of science backing any of it up until I ran into a article about pur vs par and started digging into things that route.
The only draw back I can see about this form of lighting is it may not make the tanks look as good as say a T5HO setup would to the actual human eye. But for me less carbon footprint, lower energy costs and great light for plants and animals is my #1 concern. Anyone who has gone to a place like Bigal's or petsmart in Edmonton or Calgary know it would not be expensive to augment looks with a cheap LED light on top of the one getting things done any ways
 But finding one that grows plants as well as a T5HO setup is another matter entirely.
 Oh and one more thing when your looking for quality in a product look for the warranty to be massive. TMC warranty is 5 years. Good comparatively priced LED's running on decent but outdated LED technology generally have a 3 year warranty and a lot of knock off garbage has a 1 year or no warranty at all. There is a reason for this and I encourage all who invest heavily in lighting to not be lazy in finding out why.
Well I would say most people buy Finnex because they are "good enough" for their intended use and of course their pricing. They have good experiences with the light so they recommend them to orders. Some people want more bells and whistles and are willing to spend the money on high end lights. I don't believe Finnex does much marketing, especially here in Canada. They get recommend because they are probably the best bang for your buck lights for most people.
I had both the AquaRay and Finnex LED fixtures; the AquaRay were pretty good when they first came out on the market but I believe there are better options now; at least for larger sized tanks; LED fixtures haver advanced so much in the last year or so unless you have a strict budget; i.e. under $150, there are many options out there.
The AquaRay GroBeam 500 I had for around 4 years now; in those 4 years I had to replaced the power supply twice. My oldest FugeRay is around 2 years old i believe and haven;t had any issues with any of them. The light itself is not bad but not great either, the single 19in strip would be comparable to something like a Finnex FugeRay; although by eye, I would say the FugeRay is brighter.
For a budget build, again the FugeRay would be comparable in terms of costs and budget; there would be a couple of issues with the AquaRay; the main issue is mounting over the tank; unless you are mounting them under a hood or rack, or have a glass top, you will not be able to use them out of the box. They are geared more towards the marine crowd as most marine fixtures are designed to be mounted on rails and hung. The mounting legs are sold separately and not really ideal as they are designed work with two rails; you are looking at about another $50 for tank mount. The other issue is the odd length (19"); they are not bad if you have a standard 2 foot or 4 foot tank but anything in between you are generally stuck with a single 19" module if you use their tank mounts.
Second thing is their price; there mini tiles are not bad for small cube tank, as are their single modules but once you get into two or more modules and/or their large tiles you are moving beyond the budget lights and you are moving into the higher end LED lighting where there are lots of other options like the AI Hydra, Maxspect, Exo Tech Radion, etc; For what it is (as a single module); I would say the Finnex Ray II cost about 2/3 the price with probably twice the output. From my limited plant experience, I would definitely say the plants that i have (mostly mosses) seems to better under the Ray II than AquaRay. To light up a 4 ft tank with the AquaRay you will probably need 4 of the GroBeam 600's or 2-3 of the GroBeam 1500's.
I get the whole PUR vs PAR argument; and i think that why we are starting to see more different coloured LED in planted LED lights but my requirements are fairly simple; i just want to light up my tanks with a decent amount of light for the lowest cost possible while still being able to grow some mosses and such.
-
Most invertebrates like shrimp are quite sensitive to standard medication so I generally avoid them. If you do use them it would be best to start at 1/2 the standard dosage.
The parasite look nasty because of the magnification but in person they look like little white spikes and for the most part are fairly harmless and easy enuf to get rid of with a salt dip. To be honest I don't really measure how much salt I use. Usually I out in a teaspoon into one of my small external breeder box and dip the shrimp for a second or two; the worms detaches very quickly so you don't need to keep then in there long. Than again I only did this with my neo's; have yet to see a tiger or CRS/CBS shrimp infected with these worms.
-
1) Could you help me define normal vs. abnormal behaviour for shrimp?
I would say "normal" behavior would vary from species to species but shrimps don't stay motionless out in the open for too long; a healthy shrimp would always be piacking away at the biofilm on the glass, substrate and other objects in the tank. If they need to rest (i.e. just after a molt) they tend to do so away from view like under a driftwood or the underside of a leaf or on the sponge filter. If they are just out in the open and not doing much, it is probably a good sign. Of course i had shrimps just dropped dead on me too.. one second they looked normal and next thing you know they just flop over.
2) Do you typically to a 2-3 week quarantine for new shrimp before adding them to an existing shrimp tank, as you would do for fish?
Certainty it is not a bad idea to do so if you have the tank space. Shrimps are prone to bacteria infection (see below) when they are stressed so that could spread to other shrimps and wipe out an entire population if left untreated.
3) What are the most common shrimp diseases that I should be watching for and what are the known treatments for these?
The only real disease have encountered so far are bacteria infections. It is more common in Tiger shrimps but i have seen it in neo's and my CRS / CBS as well. It occurs when the shrimps get stressed such rapid changes in their environments, temperature, warm temperatures, poor water quality etc;
symptoms include missing limbs / antennas and cloudy body.
http://www.shrimpnow.com/content.php/277-shrimp-bacterial-infection-paraguard
Think of it as a cross between Ich (similar causes) and fin/tail rot (similar effects on the antennas / limbs)
The first thing you want to do is to remedy the situation that cause them to get stressed in the first place like the temperature or poor water quality.
You than want to treat the tank with with either Paraguard + large water changes as stated in the link above or with Hydrogen Peroxide (my preferred method). I dose my 6% hydrogen Peroxide (same mixture i use for my oxydators) at 1ml / gallon daily for two weeks. It also a good idea supplement the treatments with beta-glucan (GlasGarten beta-glucan, Mosure Tonic Pro, Borneowild Shield) and Indian Almond leaves. The bad news is neither method is really at effectively at treating the infection. Unfortunately, once the individual show common symptoms the chances of them recovering is very slim. The good news is disease spread fairly slowly so you can keep it in check and eventually stop the spread of it by removing any dead specimens from the tank as soon as possible and / or any infected individuals in conjunction with the above treatments.
There is also something called Black Spot Disease. I don't have any experience with this one but there is some info here:
http://www.aquaticquotient.com/forum/showthread.php/70785-Black-Spot-Disease-and-other-diseases
There is also parasites and worms can are common in shrimps tanks
Planaria / Hydra you probably know about. Usually they don't attack adults are known to attack babies and weaken shrimps. There are several commercial treatments that work quite well (but will also kill snails)
There is also a parasite that latches on the the head of shrimps called Scutariella japonica - they look like little white worms
http://scapeclub.org/forum/showthread.php?23916-Parasitic-worms-leeches-Scutariella
http://www.shrimptank.ca/2014/03/white-worms-neocaridina-shrimp-head
You will sometimes find worms on the body as well - not sure if they are Scutariella japonica as well but treatment for both are the same; just a brief salt bath.
Molting issues can be common as well, sometimes this is caused by having less than ideal water conditions; water too hard or lacking minerals.The shrimp will look like it got struck while molting and die before it can finish molting. But generally if it is a one-off I usually just write it off as a bad molt which happens from time to time - I usually don't get too concern unless it happening to a bunch of them around the same time.
-
Iceturf, depending on where you put the RO filter you can insert a "T" or "Y" fitting to split the line after the RO membrane. For drinking water, the standard setup is a small reservoir tank (generally underneath the sink) and a separate faucet. For the aquarium line you can put the DI filter after you split the line.
To make sure you will always have drinking water readily available the standard install is to tap directly to you cold water line; the shut off valve should stop the production of water when the reservoir tank for the drinking water is full. For the aquarium side you can just use a ball valve turn it on and off whether you need to product RO water. Depending on how much water you need (i.e water changes) probably be a good idea to have a decent size reservoir with a float valve. I use standard sized aquariums but you can also use plastic barrel / drums or heavy duty rubbermaid bins.
Charis, they should be fine temporarily in the breeder box until your other tank is ready. If you want something bigger; there is the Marina external breeder boxes. They are air driven and hang on the outside of the tank (http://ca-en.hagen.com/Aquatic/Misc.-Accessories/Breeders--Salt--Silicone/10943). Most places that carry hagen product should have them - the large size is the one you want.
-
The inlet line should already have some form of shutoff / ball valve if you are tapping into the cold water line or if you are using a facuet adapter so no need for one unless it doesn't have one.
For the outlet there is two lines; one for the main "finished" RO water that will be going into your tank or reservoir and one for the waste water that should be going down the drain. You only need a shut-off / ball valve on the RO water line; you shouldn't have anything on the waste water line.
-
Thanks for the advice! Is John Guest the name brand? Or the type of valve?
I'll have to think more about the substrate. If the RO and remineralization has put given the correct parameters, are the buffering substrates necessary to keep the numbers down? If you don't have these does the pH and TDS go back up?
The generic term is push-to-connect fittings. John Guest is the brand while the product line is called SpeedFit and it is by far the most common one used by installers.
I actually prefer Parker's LIQUIfit push-to-connect fittings over John Guest but both are very good but expect to spend a premium over generic fittings you find on eBay etc;
I buy mine from US Plastics but you can probably find it locally if you only need one or two.
The main reason you want a buffering substrate is like Ron mentioned, the idea water perimeters for shrimps has a very low KH (0-1) so it will be proned to pH swings due to things like Aeration, water change or anything else that is in the tank.
I.e when I used my RODI water for with some gravel / substrate I know the PH will jump to 7.5 even though the water going in is at 6.4.
It certainty can be done without a buffer substrate but you will have to constantly monitor your pH and watch everything you put in the water.
For me, the substrate is the easiest way to control the pH and keep it stable. Whether it is ADA aquasoil for low pH or natural gravel for neutral pH or argonite / crushed coral for high pH.
RO water started you off on a "blank slate" after that it is up to whatever is in your tank to buffer the PH and the substrate plays a big role in that.
-
My RO water is around 6.4, TDS like Ron said should be 0ppm
I flush out the RO filter for a good 10-15 minutes or so whenever I change filters so probably a good idea for a new system as well. Than I let it run for about a couple of hours - I don't use that initial batch of water for my tanks (or for drinking) - treat it as waste water essentially.
Like Ron, I have a shutoff valve on both ends. I usually just shut it off on the outlet end first while it is running. than shut off the valve (and water) on the inlet side.
-
thanks, I cannot get the link to work but will check amazon for them. I like the profile/power use of them compared to standard T8/T5's
cheers,
Antonio
replied to your pm.
so far they seemed pretty decent but can;t really compare them to standard LED fixtures until the tanks are setted up. They do seemed pretty blue but i believe is because of the blue styrofoam i am using as an underlay for the tanks.
The easiest way would be to attached directly to the underside of the plywood as the strips have an adhersive 3m tape on the backside but i went the extra mile and mounted them on aluminium channels, which were by far, the most expensive components for me as i need them in a custom length (1.5m) which i cutted down to 4ft
-
Nice
which led strips are you using if I may ask? they seem to be quite bright.cheers,
Antonio (Tigs)
The LED are 5630 LED strips. I got my 5m roll off ebay but you can find them in several places like 724lights and amazon.
It use two 48" strip per level; power consumption is around 15W / metre so @ 4 ft that is around 18W or 36W total per level.
LED Type: 5050 300leds 5630 300leds 3528 300leds
Color: Warm Cool White Warm Cool White Warm Cool White
LED Quantity 300leds / 5M 300leds / 5M 300leds / 5M
Protection Waterproof or Non-Waterproof Waterproof or Non-Waterproof Waterproof or Non-Waterproof
View angle 120° 120° 120°
Working input Voltage 12VDC , 6A 12VDC , 6A 12VDC , 2A
Working power 72W/5M 75W/5M 24W/5M
Working Current / M 0.35-1.2A 0.35-1.2A 0.35-0.4A
Working Temperature -20 to 50°C -20 to 50°C -20 to 50°C
Luminous Flux 540-600 Lumens/M 1200-1320 Lumens/M 390-450 Lumens/M
So far it seem pretty bright but hard to so until I get the tanks setup with substrate and filled water.
-
it took me a while but I finally got my new shrimp rack up this past weekend but still got lots of work left to do to setup the individual tanks.
This is my 4th shrimp rack I have set up; I started thinking about it at the earlier this year when we leased out the warehouse at work where I had my last shrimp rack. The tanks on the current racks were due for a substrate change and I wanted to maximize the limited amount of space I have to fit as many tanks as possible. I also needed more tank space for my current breeding projects.
I was able to secure some industrial warehouse racking from work and got Concept to build me some custom tanks.
Rack is 4 ft. wide x 2 ft. deep by 6 1/2 ft high and consist of the following tanks;
3 x 20 gal (16" x 24" x 12") - divided down the middle for selective breeding
8 x 15 gal (12" x 24" x 12")
plus 2 x ~18 gal reservoir tanks (18" x 24" x 11") for water changes / top-ups
All the shrimp tanks are rimless w/ a 1" wide eurobrace on the top. Went the custom route as I wanted to ensure I could fit all 4 tanks on a single row as standard 15gal tanks are usually a bit wider than 12" after the trim. I also needed a way of mounting my float valves (for my auto top-up / water change system) away from the back as the HMF filter would get in the way if i went with them.
Each tank will be individually filtered using a HMF filter driven by a central air pump. My previous racks have used canister filters but I needed to fit as many tanks as possible and didn't like the idea of giving up the bottom row of tanks for canister filters. I toyed with the idea of HOB canister filters but there would have been quite costly but in terms of power draw (and outlets) and capital costs. Decided against a sump as I wanted to flexibility to have a number of different setups and again, didn't want to give up the bottom row for a sump.
Lighting is provided by LED striplights; each level has two 48" LED strips mounted on aluminium channels and attached to the underside of the plywood shelves.
In all my past shrimp rack I use a simple auto top-up / water change system which consist of float valves on each tank which are fed by a couple of "reservoir" tanks. it lets me keep the water levels of all my tanks automatically topped up as well as lets me drip in new water during water changes unattended.
Below are some photos after all but 1 of the tanks have been placed on the rack. Just did a fill test on some of tanks as will as added a test fitting a HMF filter. The 4th 15gal on the bottom row is as I still have to reorganized my power cables from my old rack to the right before setting up the final tank.
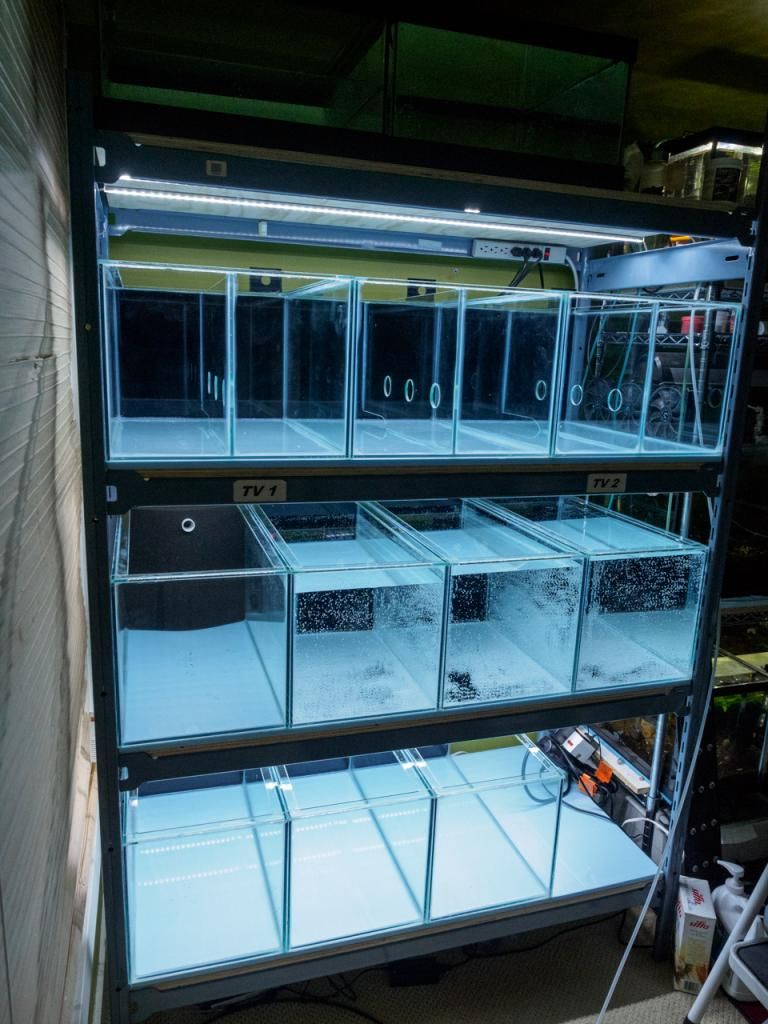
The next step is to set up the tanks; set up the HMF filter, add the substrate and start cycling the tanks
Also, still need to get the plumbing and hardware for my ATO system.
Plan is to consolidate all my shrimps from other two racks, then break down the old racks down and add another section to the right of the new rack with another set of identical tanks
-
They are hardy from what I've read but don't they take brackish water to complete breeding cycle same as crystals/ saluwesi?
Amano require brackish water to breed but they also live for like 10+ years so they will outlive pretty much all the shrimps in tanks even without breeding.
Crystals and most sulawesi shrimps breed fine in freshwater.
Be careful with ghost shrimps - some of them will hunt down smaller shrimps like the cherry shrimps if you keep them in the same tank.
-
Oops replied using the wrong account.. Lol
^ that's my other account btw


Living Room Aquastyle 35L (Fluval Stratum Test)
in jumpsmasher
Posted
Not much update this weekend, tested my top row of tanks on my new rack after a water change and there is still some nitrates so looks like it will be another week or so until they are ready.
In the mean time I started tearing down some of the tanks on the original shrimp rack; even after three years and with an OG filter hooked up to canister / hob filters, they were still buffering fine but they will need to go to make room the second section of the new rack.
I got a call from one of my friends who run a local fish shop to tell me that he finally has some of the new Fluval Stratum for me to try out. I had conflicting reports that it is new source but even the Hagen rep said it is just a repackaging of the old stuff so I wanted to try it out myself and see. Original plan was to use of the tanks on the new rack but the local Hagen had some major issues filling orders after they moved their warehouse so it has been backordered for the last 3-4 months.
I decided to clear out my Ehiem Aquastyle 35 that been running for a couple years and start flesh with the Fluval Stratum. I wanted to really test out buffering capacity and there is no better way to do that than with an UF filter hooked up to a canister / hob filter; pretty much a standard setup for me prior to switching over to HMF’s for the new rack. I also wasn’t too impress with the stock filter so this will give me the option of leaving it turned off even though it still need to be in there as it is what holds the LED light
I done a dozen tanks like this before so this will be familiar to those who have seen my previous tank setup's.
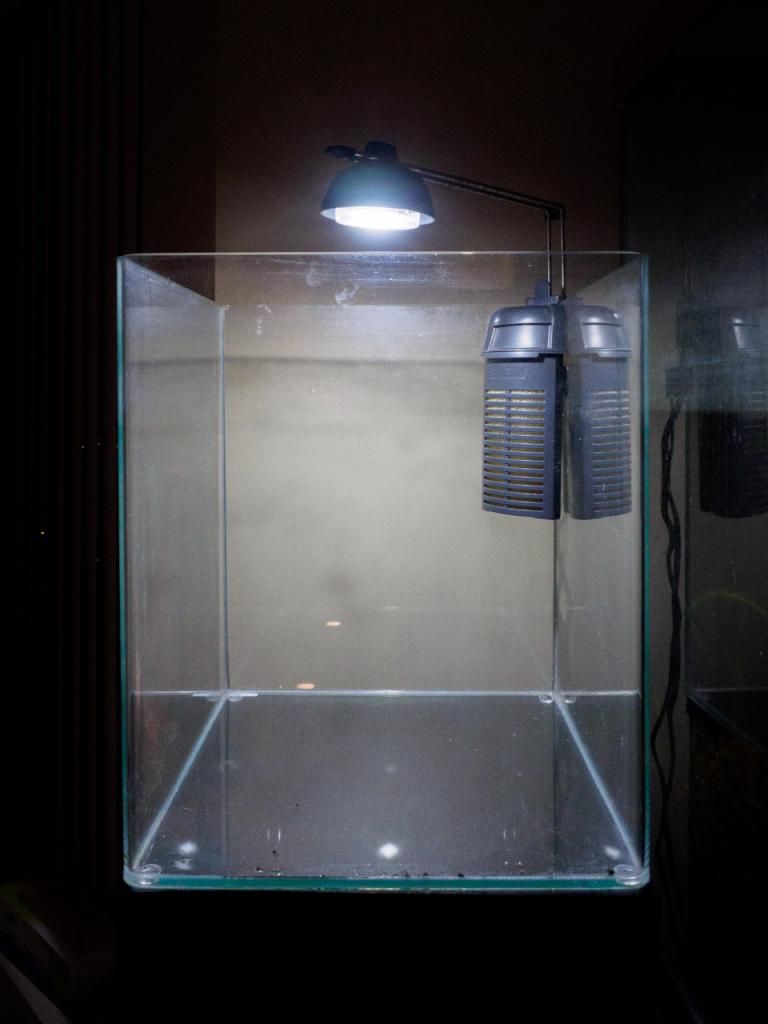
Jump’s living room Aquastyle 35L
Tank: Ehiem Aquastyle 35L
Filter: stock, UG + Aquaclear Mini
Lighting: stock
Substrate: Fluval Stratum (new version)
Hardscape: Branch wood + ADA Kobe stone
Shrimps: TBD
Here is the tank after empting it out
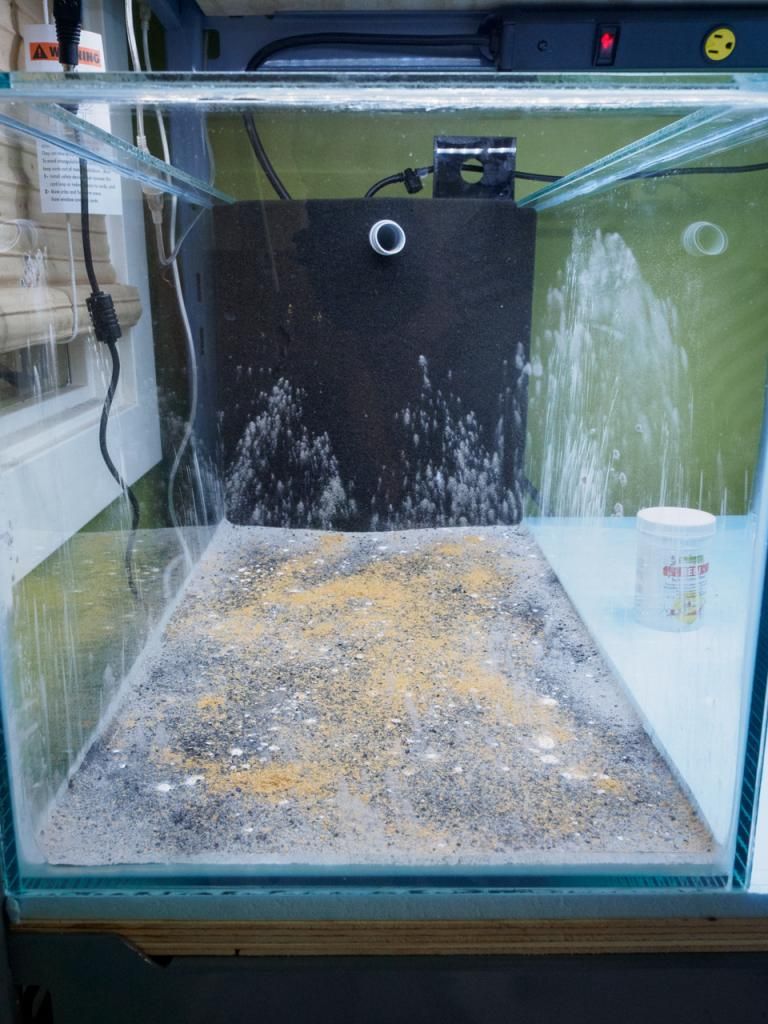
Grabbed an old AquaClear Mini and hooked it up to my usual CPVC DIY UG pipes
When filling in my UG filter I like to layer the material with the coarser lava rocks first:
Then my biological filter media (hex media / rings, Seachem Matrix, Ehiem Substrat, etc;)
Then add old sea mud powder and bacteria additives (Benibachi BeeMax, etc;)
And then finally the Fluval Stratum and a piece of branch wood and some Kobe Stones
And now to fill it up with water..
As far first impressions goes; it as darker than I remember than the original Fluval shrimp stratum and definitely darker than Amazonia; It is basically black whereas Amazonia is a dark brown. Also it seems a lot less drier than Amazonia, the granules were quite solid, even moist like; maybe it is just packaging but there is no dust when placing it in the tank or when filling it up with water.