


Gnaw
-
Posts
245 -
Joined
-
Last visited
Content Type
Profiles
Forums
Calendar
Posts posted by Gnaw
-
-
where those whale sharks?
Wow I hate to do a water change. See the lil' scuba diver walking on the bottom scrubbing algae? :shock:
-
Lucky you!
Maybe change the image file format. Or setup a free account with photobucket.
-
Retirement? I know not what you speak of!
Welcome to AA, you'll find lots of useful information and helpful members in the Cichlid section.
-
Should be fun! Thirsty dog. Alberta 1st call is a free service
 I only mention that because I've found residential service line depths below a foot! Be careful digging.
 -
ALSO, don't use plexi glass, that's also looking for disaster. I build fish tanks for a living and siliconing plexi glass and real glass is a no no.
Good thing I didn't buy any. Thanks for that, I wouldn't have known.
I picked up some Acrylic sheets yesterday for the patch job, sump, and overflow. I also picked up a couple of unions (expensive $15 for 1 1/2" ).
I did buy a small tube of an acrylic bonding agent, however I am at a loss as to what to use to bond it to the glass? Can I fix a sheet of acrylic to glass (flat) with silicone or use what I got for the acrylic? Do I use both? what do I use for the seams?
-
Well you still have the glass that you paid for and the back so you could make a large ply-wood glass tank, or two smaller ones. :smokey:
hehe, I suppose.
I think I'm going to try and patch it with plexi glass (or something) and silicone. Buying another sheet of glass over $100.00 goes against everything this project stands for.
I will never give-up!
-
Well, I called Crystal Glass and I got a quote for $303 for the replacement. I can almost afford a NEW tank for that price.... What to do, what to do.
-
If you're going to do a patch, I would patch them on the inside. THat way your bottom will still be flat.
Not sure if you could tell from the picture, but the crack is from the 1-1/2 " bulkhead almost completely to the front. Would just patching one side be sufficent? If I run my finger along the crack I can FEEL the displacement of the glass. I'm worried that moving/picking it while I continue working on it would cause further damage, even if I did patch it. I think I'm pooched.
-
You may have tightened the bulkheads too tight. If you're going to used silicon, you will only have to tighten them finger tight. Even if you just use a rubber gasket, you only want to tighted it enough that the gasket is tight.
Thanks for your reply.
I used my wrench-like hands to tighten them, I figured since the threads were just plastic over-tightening would cause some problems.
-
I'd use a new bottom panel.
If the bottom is well supported, which it looks like it will be, you can plate the bottom it will save some cost but you have to have the plate cover the bottom panel and the bottom of the sides.
Thanks for your insight.
If the tank were to lay on the foam, which is what I intended, its weight is distributed proportionally. However, if I were to reinforce the bottom on both sides it may upset this. The pieces I would silicone are very thick, it might be troublesome unless I cut-out 1/2" of the foam to allow that piece to sit flush. There is also no guarantee this will solve the problem either.
I think I may replace the sheet.
-
IF it goes 1/4" from the edge then I think it might be too close. Is there still a lip on the bottom of the tank or is it just flat glass? If it is flet glass call around to gless shops you might be able to get a sheet of salvage glass that will fit the bottom of the tank, for cheap even though you might have to wait.
I'm going to have to agree with you, looking at it I wouldn't trust it as the base support. Damn it, now I need to redrill and reinstall those bulkheads.
-
Yes I do. It is about 1/4 away from the edge though. Would I have to silicone it and add the sheets to both sides?
-
Is the crack lined up with the bulkhead? If so uh oh.
Yes, both bulkheads.
-
DISASTER!
I want to cry, there was an incident with the tank. The bottom pane CRACKED in two places when I put it on some 2x4's under it to do some work. I'm not sure what to do. Can I fix these with silicon and adhering some sheets of glass to the bottom? Or am I screwed? be honest. This is a big tank that holds a large amount of water. Is this the end of Gnaw's 100 gallon aquarium project?


-
Hi Nick, good job there!! Looks like you'll have that up and running in no time.
Thanks for the comment. I hope it have it running the garage this week as a trial run.
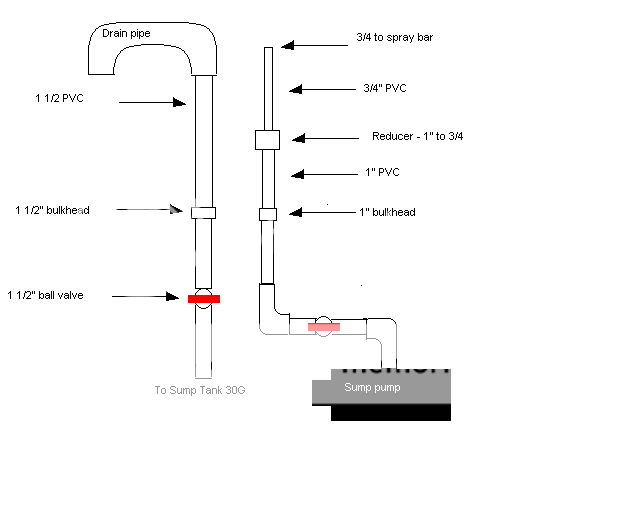
Not sure, but is it possible to have too much current from your sump or are you going to have a check valve to dial down the return flow? I guess that would also depend on what you plan on keeping.If I understand correctly, your wondering if I will have a ball-value on the return pipe?
I drew this up really quick in paint.
-
Remember when you do your plumbing to put in couplers and union valves, that way you can take everything apart with ease. ( I plumb tanks for AI)
yes, I was thinking of how I would be able to take the plumbing apart if I had to swap-out the pump or spray bar. Just to be safe I'll post some pics of what I had in mind prior to installation.
-
SO I didn't want to start the plumbing today and I opted for bed instead. Being the diehard I am I figured I'd at least silicon the over-flow together (one side only, had no more clamps. Going to let the silicone cure for a bit.

This is the sump I picked up at Rona today. It is submersible and can pump 2500 Gallons (overkilled I know) BUT says on the box if my pipe was 1 1/2 and less than 12' vertical I can have 1900-2000 GPH, this will be installed very soon... also came with 2 year warenty.

well that's it for today, more to come!
-
Alright, so I can do it! On to the tank and stand.
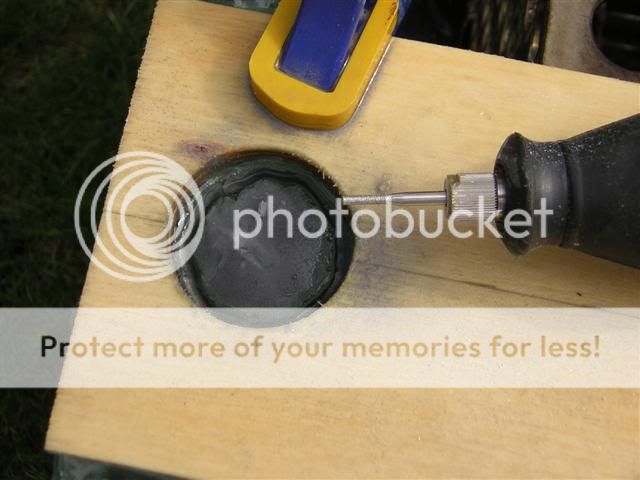
Here I cut the slot for the bulkhead and pipe to run though the stand. This is going to need some tweaking because space is limited! (Why did I only give the outside edge of my stand only an inch more tan the tank?

Cut the foamie.

Sorry for this bad picture was taken @ 5am today. Not sleeping does that to you. This is the 'measured' grid for the drain and return pipe.

After many hours of drilling and many bits later...

Yes I used silicone on them, but I figured I would NEVER have to take them out.
-
Alright and update.
I was able to install the bulkheads and I've almost completed the overflow. Waiting for cocking to dry so I can continue with the plumbing. As mentioned somewhere in this thread I don't have any fancy glass cutting tools (this includes saw-holes, which are super expensive). Needless to say my only other option was a hand held dremel and lots of diamond coated bits. I can honestly say I will NEVER use it again, took maybe five hours to drill both holes. Anyways, here are some pics.
First, I used a wood saw-hole on a thin piece of scrap to use as a cutting guide.

Cut to size.

Clamp to the class ( This was a test run to ensure that I had the skills in order to proceed)

On with the SLOW cutting...
After an hour and some...

-
Impressive setup, beautiful stock. I like the pattern and colouration of the Sulphur head, is it an adult?
I would very much like to see a full tank shot. :smokey:
-
I never heard of, or seen an ecosphere before. I think its really cool.
-
Nice story. Welcome to AA.
-
My... what big teeth you have Holly. :shock:
-
This is your 29 gallon? How many of each currently reside? Any bigger than 3"?
Gnaw's 100g Tank Restoration & Stand Project
in Gnaw
Posted · Edited by Gnaw
Today was the first day I've had time to myself for over a week.
Things are looking really bad ATM. The entire bottom is spit in three, it cannot be patched. I'm seeking alternatives but however I look at it I'm taking a loss.